
Photo Credit: Kristen Somera
Guess what? My little boy turned two this summer and I still haven't written about his FIRST birthday cake. How lame is that? So what's my excuse? Well, for one thing, I didn't get a chance to take any pictures during his party. I was running around like a crazy mom while Hubby was busy keeping the kids entertained. Pretty much the same thing happened this summer but we made sure we took pictures this time. And of course, I'll be writing about it next year...when he turns 3! Anyway, I gathered up all the pictures I could find (with the help of friends and family) so I can finally sit down and write about his adorable little cake.
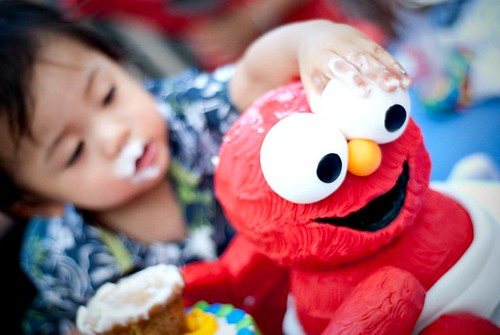
My son LOVES watching Sesame Street so for his first birthday it was all about Elmo and his friends. When I went to the party supply store to pick out decorations, I came across the cutest invitation ever. It was Baby Elmo and Baby Big Bird and it was specifically for a 1st birthday party. Perfect!
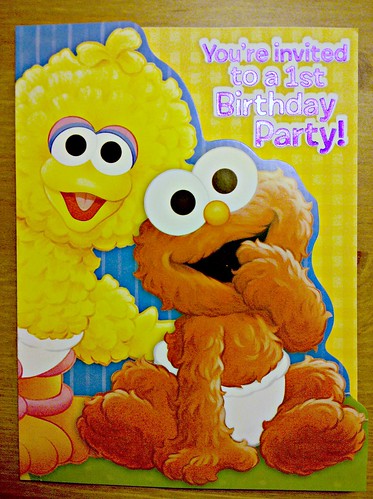
I took a look at the invitation and was immediately struck by this brilliant idea of making a sculpted Baby Elmo holding a small birthday cake. There was only one teensy weensy problem: I don't know how to sculpt cakes to save my life! Yes, I've made a few 3D cakes in the past but I've only managed to pull them off with the help of molded cake pans and cake decorating books that guided me every step of the way. This is a whole new adventure for me. It could turn pretty awesome or pretty awful. What did I get myself into?
For the sake of preserving my sanity, I opted to make Baby Elmo out of rice krispie treats rather than stressing myself over carving him out of cake. Heck, if celebrity pastry chefs use them in cake competitions, why not me? I rest my cake...I mean case.
So here's what I used to make this Baby Elmo Cake and cupcakes (brace yourselves people):
- 2 recipes of rice krispie treats (I added 2 extra cups of the rice krispie cereal to make it firmer)
- 1 recipe allergen-free banana cake recipe and vanilla frosting
- 1 recipe egg-free red velvet cupcakes
- 1 recipe egg-free chocolate cupcakes
- 3 pounds red rolled fondant
- 1 1/2 pound white rolled fondant
- 2 ounces orange rolled fondant
- 1 pound yellow rolled fondant
- 1 pound green rolled fondant
- 1 pound blue rolled fondant
- 1 cup vegetable shortening
- shell tool from gumpaste modeling tool kit
- veining tool from gumpaste modeling tool kit
- toothpicks
- bamboo skewers
- paring knife
- small spatula
- black icing color
- small paintbrush
- black food color pen
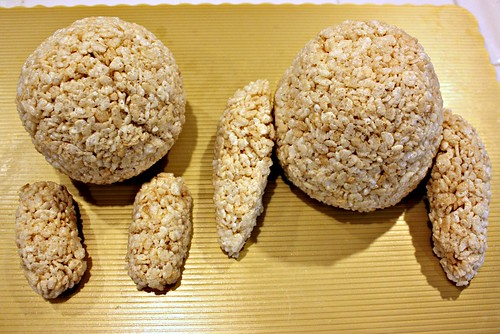
First, I formed the rice krispie treats into Elmo's head, body, arms and legs. I used the invitation as a guide to see if I got the proportions right. I made the arms and legs flatter on one side so they would attach better to the body. I let the rice krispie treats firm up for about two hours before covering them with fondant.
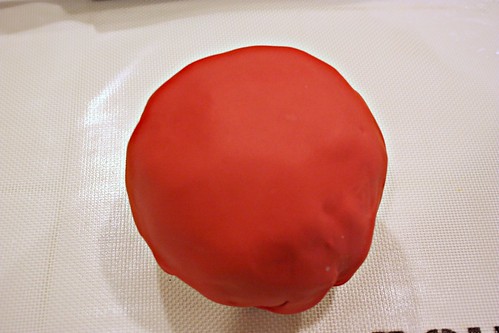
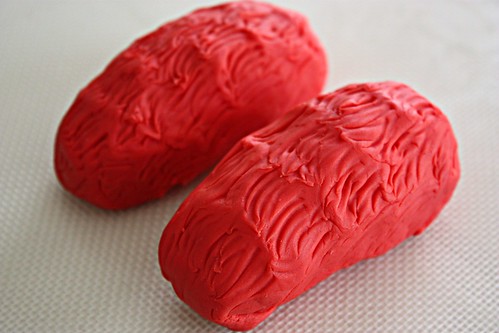
I rolled some red fondant to about 1/2 inch thickness and covered Elmo's head. I applied a layer of vegetable shortening onto the red fondant to keep it from drying out and to make it more pliable to create Elmo's fur.
I used a shell tool to create Elmo's fur. My brother actually gave me the idea of using it. At first, I was layering short strands of rolled fondant onto the head but I soon realized it was gonna take me FOREVER to finish. Since my brother studied fine arts in college and he knows how to sculpt, I asked him if there was a better way to do this.
He rummaged though my cake decorating tools and narrowed it down to the veining tool and shell tool. He tested them out on a small piece of fondant and the shell tool was the clear winner. To make the fur, simply press the shell tool against the fondant and gently sweep it down and to the side. When you pull the shell tool away from the fondant, it creates nice wisps of fur.

I repeated the same technique for the body, arms and legs but I made sure I varied the direction of where the fur was going. I didn't realize I was going the same direction for the head until I stopped and looked at it. I tried to redo it but the fondant was already drying so I just left it as is and moved on.
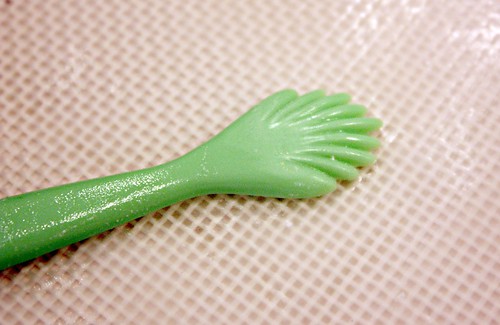
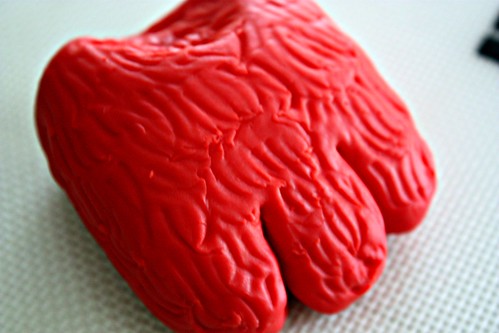
To make the hands and feet, I formed two round pieces for the hands and two square pieces for the feet. I used the shell tool to make the fur then used a paring knife to cut sections for the fingers and toes. I attached the hands to the arms and the feet to the legs with some bamboo skewers. I covered the seams by laying a strip of fondant over it and creating more fur with the shell tool.
To make Elmo's diaper, I wrapped a piece of white rolled fondant around the base of the body. I used the veining tool to create a crease across the top of the diaper.

To assemble Baby Elmo, I stuck a long bamboo skewer through the middle of his body and attached his head on top. I attached the arms and legs on each side of his body and rested each hand on top of each foot.
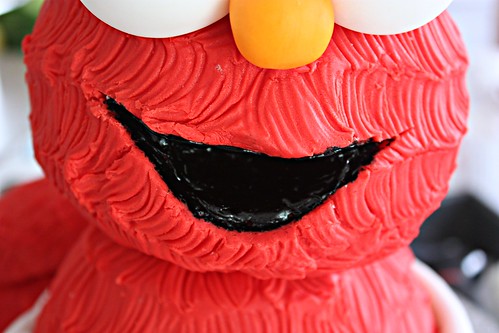
To shape Elmo's mouth, I used a paring knife to cut through the fondant and rice krispie treats then I gently shaped it to make Elmo's adorable smile.
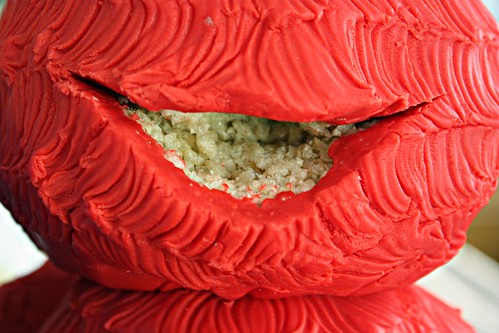
I covered the exposed rice krispie treats with a small piece of fondant before painting the inside of Elmo's mouth with black icing color.
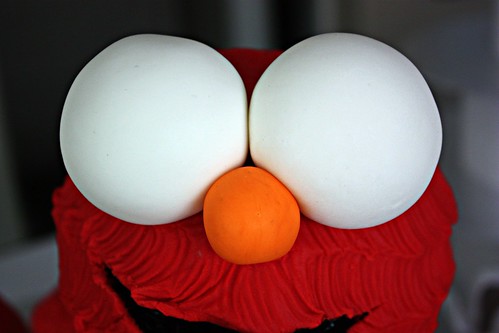
To make the eyes, I rolled some white fondant into two balls and attached them on top of Elmo's head with some toothpicks. I probably should have used fondant-covered rice krispie treats instead of using solid fondant because they were so heavy and it took several toothpicks to keep them in place. Ayayay! If it hadn't been for that little orange nose, his eyes would've fallen off. I made some round circles of fondant and attached it to the center each eye then painted them black to make the pupils.
Here's the finished Baby Elmo sans birthday cake. Isn't he just adorable? My friend Maggie has this amazing machine called a Cricut Cake and she made letters out of fondant to spell out his name :-)
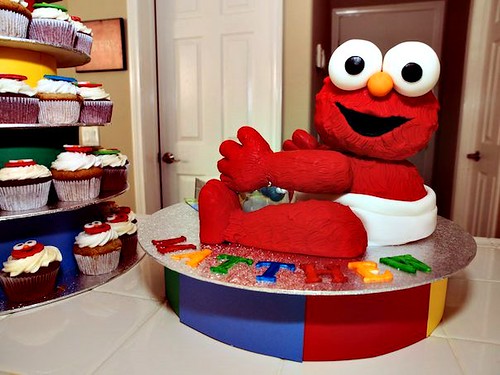
Photo Credit: Ryan Rivera
For his little birthday cake, I baked my allergen-free banana cake in two 6-inch cake pans (the rest of the batter I used to bake cupcakes). I rolled some blue and green fondant and cut them into strips to decorate the sides and used round cutters to decorate the borders. I made yellow fondant scrolls for the top as well as circles stacked together to place the Baby Elmo candle on.
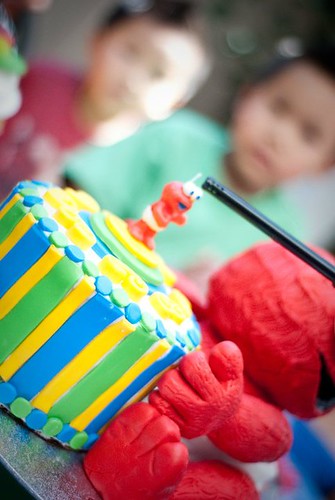
Photo Credit: Kristen Somera
I also baked red velvet and chocolate cupcakes to accompany the Baby Elmo cake. For the cupcake toppers, I made some Elmo faces and friend Maggie made some monogram discs. To make the Elmo faces, I used a small round cookie cutter to make circles out of red fondant. I attached two white circles for the eyes and a small orange circle for nose then I used a black food color pen for the eyes and mouth. To make the monograms, Maggie used her Cricut Cake to make the M's out of rolled fondant and attached them to fondant circles.
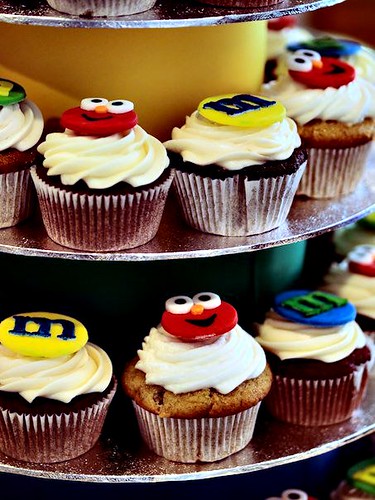
Photo Credit: Ryan Rivera
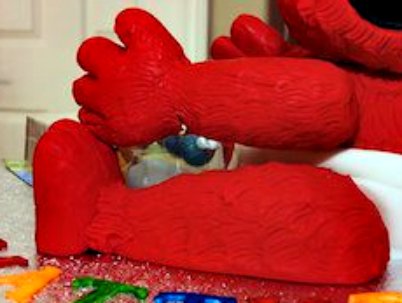
After we sang "Happy Birthday and the birthday boy blew out his candle, one of the kids pulled out Elmo's eye and pretty soon the rest of the kids wanted a piece of Elmo too. They passed around his eyeballs like they were playing hot potato and one kid actually ate Elmo's nose! When the party was over, Elmo's eyes found their way back on his head but, as you can tell, they were roughed up quite a bit :-)

5 comments:
Oh my goodness, how funny!
The cake is so cute!
Perfect idea.....congratulations!!!!!
Hi, Your beautiful elmo cake has been featured on best of the web first birthday cakes, check it out here... BEST OF THE WEB FIRST BIRTHDAY CAKE IDEAS
This is so cute! May I ask which Rice Krispies treats recipe do you use? :)
Post a Comment