Sunday, December 28, 2008

Celebrating with Champagne Truffles

Champagne Truffles

What could be more indulgent than this? I took my favorite champagne and made it into truffles! Oh yeah... Let's ring in the New Year!

I put a couple of these champagne truffles in the goodie boxes I made for Christmas. They're so smooth and luscious that the flavors will just melt into your tongue as soon as you bite into them. I especially love the fruity notes of Moet and Chandon, and Grand Marnier just seems like the best pairing for it.

Champagne Truffle

For the ultimate indulgence, you can make a Champagne Truffle Torte. I made this one for my cousin's birthday. It's four layers of chocolate cake, filled with three layers of champagne truffle filling and frosted with chocolate buttercream. Now that's what I call a celebration cake!

Champagne Truffle Torte

The best part about making these champagne truffles is I always have just enough bubbly left over to drink and enjoy :-)

Champagne Truffles

Allergy Note: contains dairy
makes about 60 truffles

truffle filling:
3 1/2 cups semi-sweet chocolate chips
1/4 cup butter
3/4 cup champagne (I use Moet et Chandon White Star NV)
1/4 cup honey
1/4 cup liqueur (I use Grand Marnier)

coating:
1 to 2 cups3 to 4 cups powdered sugar
semi-sweet or bittersweet chocolate chips

NOTE: If you can get your hands on some Ghirardelli or Guittard chocolate chips, I find that they have a smoother texture that works great for truffles.

For the truffle filling: place chocolate chips in a large bowl and set aside. On low heat, melt together butter, honey, champagne and liqueur in a saucepan. Pour over chocolate chips and stir until smooth. Cover with plastic wrap and refrigerate for at least 1 hour or until the mixture is slightly firm.
Line a cookie sheet with parchment paper or waxed paper. Measure out teaspoonfuls of the truffle filling and drop them onto the cookie sheet. Freeze them for 15 to 20 and then roll them into balls. Freeze them again for 10 to 15 minutes more or until firm.

For the coating: Sift half of the powdered sugar on a cookie sheet and keep the other half in the sifter. Set aside. Melt chocolate chips in a double boiler; stir until smooth. Place the cookie sheet of naked truffles on your left, the bowl of coating chocolate in front of you, and the cookie sheet with powdered sugar on your right. Drop the truffles into the chocolate coating one at a time, quickly coat them and remove with a fork. Gently shake off any extra chocolate and place the truffle onto the powdered sugar on your right. Sift more powdered sugar over the truffles and let the coating chocolate set before transferring the truffles.
You can store the truffles in an airtight container in the refrigerator.

Wednesday, December 24, 2008

Crema de Fruta

Crema de Fruta

Here's another one of my favorite Filipino desserts. It's called crema de fruta (which translates to "fruit cream") and it's what I'm making for our family gathering this Christmas. I'm not sure why this dessert is so synonymous with the holidays, but why ask why? All that matters is it's sooooo good! There are so many variations of this dessert but the one I'm familiar with is a sponge cake layered with stirred custard and fruit cocktail and topped with unflavored gelatin.

Crema de fruta - upclose

My mom gave me a recipe for crema de fruta a long time ago but it only had instructions on how to make the custard and fruit gelatin - not the cake. She told me that when she makes it, she just goes to the local bakery and asks to buy a sheet of sponge cake, the same kind that's used to make jelly rolls. This saved her time baking, especially during Christmas when there's so many activities going on.

Crema de Fruta in tray

I decided to use a hot milk sponge cake for my version of crema de fruta because it's quicker and easier to make than traditional sponge cake. If you're really short on time, you can just buy the sponge cake at a local bakery like my mom did. Ladyfingers or pound cake are good substitutes as well. I also added a little cake syrup, a secret ingredient that most pastry chefs use to keep cakes moist. It's basically simple syrup that you add flavored liquers like Grand Marnier or kirsh.

Merry Christmas! Maligayang Pasko! Joyeux Noel!

Crema de Fruta
Allergy Note: contains eggs, dairy and wheat

sponge cake:
1 cup flour
1 tsp. baking powder
2 large eggs
1 cup sugar
1 cup milk
2 Tbsp. butter
1/2 tsp. vanilla extract

cake syrup:
1/4 cup sugar
1/4 cup water

custard:
1 cup sugar
1/2 cup flour
3 cups milk
4 egg yolks
1/4 cup butter
1 tsp. vanilla extract

30 oz. can of fruit cocktail in heavy syrup
1 Tbsp. unflavored gelatin

To make the sponge cake:
Preheat oven to 350 degrees F. Grease and flour a rectangular glass baking pan (I used an aluminum pan because sometimes I forget to bring back my baking pans during potlucks or family gatherings). Sift the flour and baking powder together. Set aside. In a mixing bowl, beat the egg yolks until thick then slowly add the sugar. Continue mixing until light and fluffy. Gradually add the flour mixture.
In a saucepan, combine milk, butter and vanilla extract; cook just until the butter has melted. Slowly pour into the batter; mix until combined. Pour into prepared pan then bake for 20 to 25 minutes or until a toothpick inserted into the center of the cake comes out clean. Let cool completely.

To make the cake syrup:
Place sugar and water in a saucepan; cook until the sugar has dissolved. Drizzle lightly over the sponge cake.

To make the custard:
In a saucepan, combine sugar, flour and milk. Cook in medium-high heat, whisking constantly, until it thickens. Pour some of the mixture over the egg yolks and mix together till combined. Add the egg yolk mixture to the saucepan. Cook for a few more minutes then remove from heat.
Stir in butter and vanilla extract. Pour over the sponge cake. Let cool.

In a large mixing bowl, pour in the fruit cocktail and sprinkle the unflavored gelatin on top. Let the gelatin "bloom" (absorb liquid and expand) before mixing it in to the fruit cocktail. Microwave for 30 seconds to 1 minutes to melt the gelatin. Pour over the custard.

Refrigerate for at least 2 hours before serving.

Thursday, December 18, 2008

A Sea of Salted Caramels

A sea of salted caramels

This is my first attempt at making salted caramels. I guess the whole idea of standing by the stove and stirring a pot of hot sugar just didn't appeal to me. I'd much rather bake cookies or dip chocolate truffles. But my encounter with a french macaroon made me reconsider.

A few months ago, my sister went to Paris and brought me back an assortment of Laduree macaroons. They all tasted heavenly but I completely fell in love with the caramel au buerre sale (caramel with salted butter). Oooooh...the sweet and salty combination made my tastebuds jump for joy. Too bad there were only two of them in the box :-(

With the flavor of caramel au buerre sale deeply ingrained in my memory, I decided to take a crack at making it. I took a caramel recipe from one of my cookbooks and added a little sea salt to it. It took every ounce of my patience to stir and stir . . . and stir some more, until the candy thermometer finally reached the proper temperature. Yes, I got impatient and lifted the slab of caramel off the pan before it completely cooled, which explains the ugly ripples on top. Ugh!

Now, if only I could restrain myself from devouring all of these, maybe they'll make it into the goodie boxes :-)

Salted Caramel

Salted Caramels
(adapted from the Better Homes and Gardens New Cookbook)
Allergy Note: contains dairy

1 cup butter
2 1/4 cups brown sugar
2 cups half-and-half or light cream
1 cup light corn syrup
1 tsp. sea salt
1 tsp. vanilla extract

sea salt

Grease and line an 8x8 square pan with parchment paper or aluminum foil. Leave enough parchment paper or aluminum foil outside the pan so the caramel can be lifted out later. Set aside.
In a 3-quart saucepan, melt butter on low heat. Add brown sugar, heavy cream, corn syrup and sea salt. Cook over medium-high heat, stirring until it reaches a boil. Lower the heat to medium and attach a candy thermometer to the pan. Keep cooking and stirring until it reaches 248 degrees F (firm ball stage). Remove the candy thermometer and remove from heat. Stir in the vanilla extract and immediately pour into the prepared pan. Sprinkle sea salt over the caramel. Let the caramel cool completely, then lift it out of the pan. Cut into 1-inch squares. Makes about 64 caramel candies.

UPDATE: I tried the shortcut version a couple of days ago and it tasted just as good as the regular version. By replacing the cream with a 14-ounce can of sweetened condensed milk, it shortened the cooking time to about 15 - 20 minutes. Oh joy!

Monday, December 15, 2008

Christmas Sugar Cookies

Christmas Tree Cookie

I've been making desserts all my life, I even went to pastry school, but I can't even bake a "normal" cake or cookie for my son. This is the irony of my life. When my son was diagnosed with multiple food allergies, I thought I would never be able to make him all my favorite desserts and pastries. Key ingredients like flour, butter, milk and eggs were off-limits. I couldn't even look at tv commercials where the kids were helping their moms bake sugar cookies. It was heartbreaking because I wanted that moment with my son too.

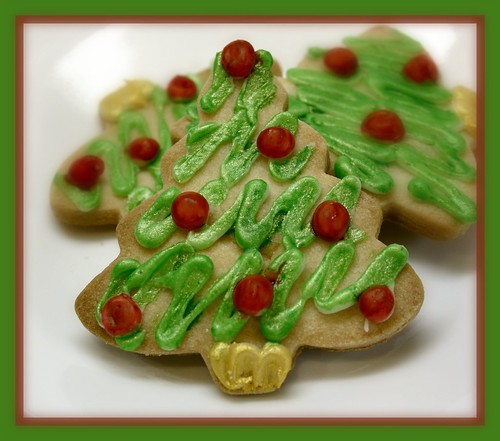
Fortunately, my son outgrew his wheat and dairy allergies last year. I didn't get the chance to find a good egg-free cookie recipe in time for Christmas, but this year, I was able to modify one of my favorite sugar cookie recipes for him. These cookies are light, crispy and buttery. They taste perfect without any icing at all, but since I recently found a glace icing recipe from Our Best Bites, I wanted to try it out. In 
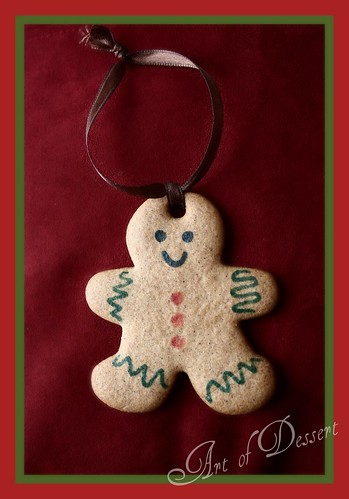
my gingerbread cookie post, I mentioned that I used food color markers and 
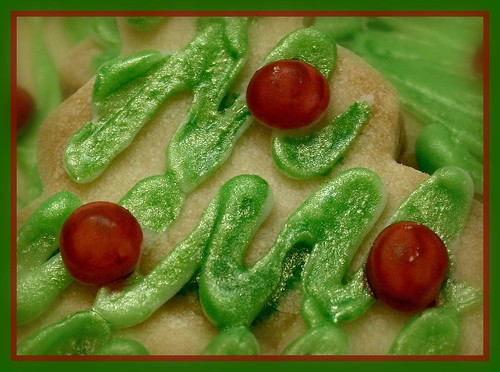
marshmallow fondant to decorate the cookies instead of royal icing. Now, I have this great icing to use for decorating as well! I added more powdered sugar so I could pipe it onto the cookies. When the icing was dry enough, I mixed a little bit of clear alcohol (lemon extract or vodka) with some food color gel and gold luster dust to paint it.


Christmas Tree Cookie

Christmas Sugar Cookies
makes 4 dozen cookies, 3 inches in diameter
Allergy Note: contains dairy and wheat

1 1/2 cups flour
2 Tbsp. cornstarch
3/4 cup powdered sugar
3/4 cup butter, softened to room temperature
1/2 tsp. vanilla extract

Preheat the oven to 375 degrees F.
Sift the flour, cornstarch and powdered sugar into a mixing bowl. Add the butter and vanilla extract; mix together to make a smooth dough. Divide in half, cover in plastic wrap and refrigerate if needed. On a lightly floured surface, roll out the dough to about 1/4 inches thick. Cut into shapes and transfer onto a cookie sheet lined with parchment paper or silicone baking mat. Bake for 15 minutes or until the golden brown.

Glacé Icing
Allergy Note: contains dairy ingredients

1lb powdered sugar (about 3 3/4 C)
1/4 cups plus 2 Tbsp. whole milk
1/4 cups plus 2 Tbsplight corn syrup
1 tsp. extract (vanilla, almond, lemon, peppermint etc.)
food coloring (for best results, use gel or paste)

With a whisk, combine powdered sugar and milk until smooth. Then stir in corn syrup and extract. Add food coloring into the icing or paint it on afterwards like I did. You can adjust the consistency of the icing for piping by adding more powdered sugar.

Our Best Bites has a wonderful step-by-step tutorial on how to decorate cookies with glace icing so check it out.

Saturday, December 13, 2008

Chocolate Orange Truffles

Chocolate Orange Truffle

Would you believe that the secret ingredient in these wonderful chocolate orange truffles is Tang? Yes, that day-glo orange powdered drink that most of you probably drank as kids. I got the crazy idea to use Tang to flavor these truffles from Retro Bakery in Las Vegas. This past summer, they created the creamsicle cupcake, a vanilla cupcake with Tang buttercream. After reading this, I was so intrigued that I went ahead and bought some Tang, just to make the buttercream and taste it for myself. Wow! They were right. It tasted EXACTLY like an orange creamsicle.

Of course, being the chocoholic that I am, I wondered how this buttercream would taste with a little bit of chocolate. The flavor reminded me of those chocolate oranges that you had to whack and unwrap. I don't know why they're so popular around Christmastime. But when it was time for me to start thinking about truffle flavors for my goodie boxes this year, those chocolate oranges came to my mind and so here's my take on it. You don't have to bash these luscious truffles in order to eat them. Just sink your teeth into them and enjoy.

Chocolate Orange Truffles

Chocolate Orange Truffles

makes about 60 truffles
Allergy Note: contains dairy

truffle filling:
16 oz. milk chocolate chips
1 cup heavy cream
4 Tbsp. butter
1 oz. corn syrup or honey
2 Tbsp. Tang orange drink mix
1 tsp. vanilla extract

coating chocolate:
1 cup milk chocolate chips
1 tsp. vegetable shortening

For the truffle filling, place the chocolate chips in a medium bowl and set aside. Combine heavy cream, butter, corn syrup, Tang in a saucepan and cook over low heat until it starts to simmer. Remove from heat and pour over the bowl of chocolate chips. Wait for a few minutes for the chocolate to soften. Add vanilla extract. Using a wooden spoon or rubber spatula, slowly stir the mixture until it becomes smooth and shiny. Cover with plastic wrap and refrigerate for 1 hour or until the mixture is slightly firm.
Line a cookie sheet with parchment paper or waxed paper. Measure out teaspoonfuls of the truffle filling and drop them onto the cookie sheet. Freeze them for 15 to 20 and then roll them into balls. Freeze them again for 10 to 15 minutes more or until firm.

For the coating chocolate, combine the chocolate chips and vegetable shortening in a bowl and melt over hot (not boiling) water. Stir until smooth. Place the cookie sheet of naked truffles on your left, the bowl of coating chocolate in front of you, and a new cookie sheet lined with parchment or waxed paper on your right. Drop the truffles into the chocolate coating one at a time, quickly coat them and remove with a fork. Gently shake off any extra chocolate and place the truffle onto the cookie sheet on your right. You can also try enrobing the truffles by hand.
You can store the truffles in an airtight container in the refrigerator.

Friday, December 12, 2008

Have your cake and eat it too: the making of a fake wedding cake

Mike and Janice's Wedding Cake

In these tough economic times, more and more couples are trying to find creative ways to have the wedding of their dreams without spending a fortune. But when in comes to the wedding cake, there really isn't a lot of options out there. You can have a cupcake tower or serve individual desserts instead, but if you have your heart set on a wedding cake, even a small plainly-decorated cake can cost a few hundred dollars. So what can a budget-conscious couple do? Consider using a fake wedding cake.

Pastry chefs and cake decorators have been using fake cakes for many years now. You've probably seen one or two displayed at a local bakery. They are usually made out of styrofoam cake dummies that are covered with either real icing or artificial icing. They are used as showpiece items at cake competitions and also used for practicing or demonstrating cake decorating techniques. Fake cakes have also been used for magazine photo shoots and even movies, where using a real cake would be impractical as well as expensive.

In the past few years, people have been starting to use fake cakes as cost-effective alternatives to real wedding cakes. Couples can rent a fake display cake for their reception and buy affordable sheet cakes to serve to their guests. But what happens when it's time to cut the wedding cake? A slice of sheet cake will be placed nearby but hidden from view, while the bride and groom pretend to cut the fake cake and pose for pictures. The couple can smoothly transition into feeding each other the slice of sheet cake without anyone noticing a thing. Some fake cakes have a secret compartment where a real cake slice can be inserted. Others simply have a slot for the knife to go through. Another variation is to have a real cake for the top tier and the rest is fake. The couple would cut into the top tier and then save it for their first anniversary.

Kim and Rodney's Wedding Cake

I got to make my first fake wedding cake this summer. It was for my cousin Rodney and his fiance, Kim. They wanted a simple but elegant cake with a satin ribbon band, pearl border and their monogram etched on the cake. Their wedding was going to be outdoors at the Mount Woodson Country Club and I was worried about the anticipated hot weather for that day. Anyone who makes cakes can probably attest to the fact that extreme heat and wedding cakes are a bad mix. It's bad enough that I fret and fuss over cakes in general, but if it's a multi-tiered wedding cake, I get really perfectionistic. I'd be crushed if anything happened to my cousin's wedding cake so I decided to bring up the idea of making a fake wedding cake to Rodney and Kim, and they let me do it. Whew!

I went to my local cake decorating supplies store only to find out that they don't always keep 4-inch high cake dummies in stock. I had to special order them, which could take weeks so I had to improvise. First, I thought maybe I can stack and glue cardboard cake circles together, cover them in plastic wrap and then frost them. Seems like a good idea, but then I saw a Food Network Challenge on tv and they were making cereal skyscrapers. Bingo! I decided to make the cake out of rice krispie treats instead. I just frosted them with a thin layer of buttercream before covering them with rolled fondant. I cut out a compartment at the bottom tier so I could put a slice of real cake inside it. The cake turned out beautifully and at the reception, no one even realized it was fake. After the cake-cutting ceremony, slices of the sheet cakes I made were brought out from the kitchen, where they stayed nice and cool in the refrigerator until it was time to cut and serve them. I didn't keep the fake wedding cake because it was made out of rice krispie treats and it wasn't meant to be reused anyway.

Mike and Janice's Wedding Cake

A couple of weeks ago, I made another fake wedding cake. It was for Mike and Janice's wedding at the Rancho Bernardo Inn and this time I made sure to get the styrofoam cake dummies in advance. It just so happened that their wedding invitations had a scroll design on it, so I was so happy I got to decorate their cake in my favorite scrollwork pattern. I made a five-tiered cake covered in rolled fondant and royal icing scrolls which I handpainted with gold luster dust. If I had known about fake wedding cakes back when I got married, I would've wanted this exact cake. Well, maybe I can keep this for my 10th wedding anniversary :-)

Cutting the styrofoam was a little trickier than I had expected, but I manage to smooth out the rough edges by taping over it and then covering it with rolled fondant.

Real cake slice compartment

On the day of the wedding, I placed a slice of real cake (which I covered with rolled fondant) inside the compartment. Instead of piping royal icing scrolls, I decorated the real cake with fondant scrolls. It didn't need to dry like royal icing so I was able paint them with gold luster dust right away.

Mike and Janice's Wedding Cake - real slice

I placed two strips of fondant to cover up the small gap between the fake cake and the real cake. They also served as guides for Mike and Janice to know where to cut the fake cake. I finished off decorating the real cake by making teardrop shaped fondant and overlapping them to make the border. It looked just like the piped royal icing on the rest of the cake. Pretty cool.

Real Cake slice with markers

When I brought the fake cake into the ballroom, I was surprised to see that Mike and Janice had placed the cake table directly behind them, and on a platform so everyone can see it. Wow! I remember them telling me that they were going to spotlight the cake, but I had no idea it was going to be displayed in such a beautiful way. That definitely made my day and I'm so glad they loved their cake.

Mike and Janice's Wedding Cake

I'm really liking this idea of making fake wedding cakes. Maybe next time I'll make one without a secret compartment or try making one with a slot for the knife to go through. I've already told all my cousins that I'm making them fake cakes for their weddings. I'm pretty sure they don't mind - that's one less stressed out person on their special day. If this catches on, I'm probably not going to want to make a real wedding cake ever again. LOL

Monday, December 8, 2008

The Gingerbread Man

Gingerbread Man Ornament

"Run, run, as fast as you can.
You can't catch me,
I'm the gingerbread man!"

I was feeling a bit under the weather this weekend but I managed to pull myself out of bed for a couple of hours to help "the boys" decorate the Christmas tree. We had baked some gingerbread ornaments earlier in the week so all we had to do was hang them on the tree.

I'm always on the lookout for allergen-friendly recipes, so when I found an egg-free gingerbread cookie recipe in The Advanced Professional Pastry Chef, I couldn't wait to try it. I converted the recipe from ounces to cups and, as usual, tweaked a few ingredients.

Decorating the tree

When it was time to decorate the cookies, normally I would use royal icing. But since it has egg whites, I had to find another way to decorate them. I decided to use Wilton Food Writer Edible Color Markers and marshmallow fondant. I put the fondant eyes and mouth as soon as they came out of the oven so they would soften a little and stick to the cookies. If you want, you can also use confetti sprinkles or just simply use a toothpick to draw on the eyes, mouth and buttons.
If you're planning to make them into ornaments like I did, poke a hole in the cookie prior to baking. I used a medium-sized piping tip but you can also use a drinking straw or bamboo skewers - just make sure the hole is big enough to put ribbon or string through it.

To make a gingerbread house, it's best to roll the dough directly onto a cookie sheet lined with parchment paper. Roll them to about 1/4 inch thickness. Use a paring knife to cut out the templates for your house then refrigerate the dough for at least 30 minutes so it will not spread too much while baking.


Gingerbread Ornaments

Gingerbread Cookies
Allergy Note: contains dairy and wheat

2 1/2 cups flour
1 1/2 tsp. ground cloves
2 Tbsp. ground cinnamon
2 Tbsp. ground ginger
3/4 tsp. baking soda
1/2 cup butter *
3/4 cup sugar
1/4 cup milk *
4 Tbsp. corn syrup or honey

* for dairy-free alternatives: you can use Spectrum shortening in place of the butter; for the milk, you can substitutes like rice milk or soy milk, whichever suits your dietary needs.

In a saucepan, cook the butter, sugar, milk and corn syrup at low heat until the butter has melted and the sugar has dissolved. Remove from heat then pour into a mixing bowl and let it cool for a few minutes. Sift together the flour, cloves, cinnamon, ginger and baking soda. Add to the butter mixture and mix until combined. Flatten the dough onto a cookie sheet lined with parchment paper. Cover with plastic wrap and refrigerate for at least 2 to 3 hours. Since the dough tends to get too soft at room temperature, take out only a portion at a time. Keep the rest of the dough in the refrigerator. Roll the dough to about 1/8 inch thickness. Cut out shapes and transfer them onto a cookie sheet lined with parchment paper. Bake at 400 degrees F for 10 minutes, or until golden brown.

Makes 4 dozen cookies, 3.5 inches x 3.5 inches in size

Thursday, December 4, 2008

Desserts in a Bottle

Aside from my passion for making desserts, I've got a terrible obsession with sweet gourmand fragrances. Over the years, I've amassed quite a collection of body sprays, lotions and perfumes that smell like creme brulee, chocolate truffles, vanilla ice cream and even cotton candy. If it smells like dessert, I'll wear it. It puts me in a good mood and I think it makes everyone else around me less grumpy. One side effect though: it makes me (and probably the people around me) crave for sweets. But with all the cookies and candies around during the holidays, especially at my house, I'll have no trouble satisfying my sweet tooth.

Here are a few of my favorite fragrances. The best part about these sweetly scented indulgences: zero calories and zero guilt. I can't say the same about the cookies and candies though.


Serendipity 3 Serendipitous Perfume is a warm chocolate perfume with notes of Tahitian vanilla and blood orange. This was my very first gourmand fragrance and it's still one of my favorites after all these years. I love wearing this during the holidays because the scent reminds me of a cozy cup of hot chocolate with loads of marshmallows on top. Mmmmmmm....


Pink Sugar by Aquolina has become my everyday fragrance for the past couple of years. It smells like cotton candy. Need I say more? This has strong staying power so a little spritz will go a long way. The notes are bergamot, sicilian orange, raspberry, fig leaves, lily of the valley, licorice, strawberry, red fruit, cotton candy, vanilla, caramel, musk, wood and powder.


Chocolovers by Aquolina starts off smelling like a chocolate orange truffle but then it morphs into this sensually mysterious fragrance that reminds me of Nutella. Ferrero Rocher anyone? The notes include bergamot, orange, lemon, lily of the valley, coriander, hazelnut, vanilla, malt and musk. Very sexy and yummy too.


Vanille Extreme by Comptoir Sud Pacifique has a warm and spicy vanilla scent that's not syrupy sweet like some vanilla perfumes I've come across. I actually like layering this with other fragrances. The notes are tahitian vanilla and spices - that's it. Simple yet amazing. Some might think it smells like cake batter. I just think is smells deeeeelicious.


Jaqua's Pink Buttercream Frosting Body Mist is probably the most authentic bakery scent I have. It smells like sugar cookies, Krispie Kreme donuts and birthday cake all rolled into one. How can you not be happy after smelling this? It's alcohol-free so it doesn't have the same staying power as an eau de parfum, but I don't mind reapplying this sweet aromatherapy.


Demeter Fragrance Library has a massive selection of fun and wacky scents but Condensed Milk is my favorite. It REALLY does smell like sweetened condensed milk. Trust me, I should know. It's kind of a comforting scent so I like dabbing a little on my wrists before I go to bed. Sweet dreams...