
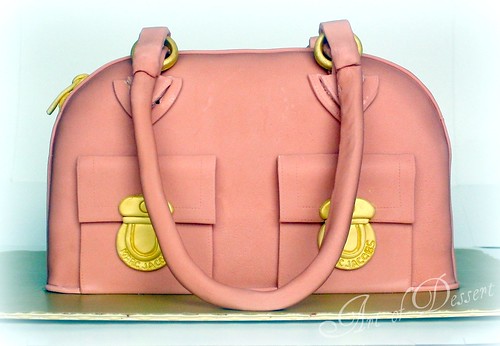
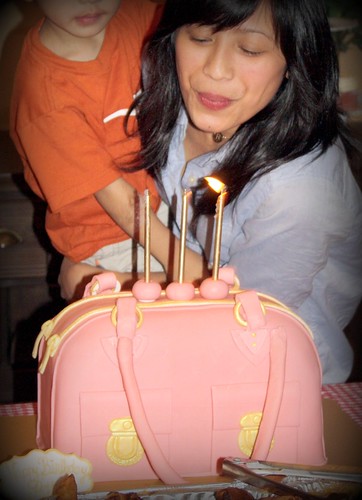
My sister is truly an inspiration to me. Six years ago, she decided to forget going to law school and follow her dream. Without telling anyone, she applied to the Fashion Institute of Technology and got accepted. Soon after breaking the news to everyone, she packed up her bags and moved to New York City to study fashion design. It took a lot of guts for her to make such a risky decision, especially after investing so many years of schooling. But it was a bold move that paid off in ways she couldn't have imagined. Today, she's working as a handbag designer for Marc Jacobs , one of the top fashion designers in the world. She was the one who encouraged me to go to pastry school and I'll be forever grateful to her for that. So when she told me she was coming home to celebrate her 30th birthday, I wanted to make her a cake that symbolized her dream fulfilled. I just had to make her a Marc Jacobs bag cake.
This wasn't an easy project for me. I love decorating cakes but making sculpted or 3D cakes is a bit intimidating. I still have so much more to learn and since I never had any formal training in art, making these cakes look true-to-life is an added challenge. I tried to make a bag cake a few years ago and it turned out okay, but I really wished I had a book to guide me.
So this time around, I read Elisa Strauss' The Confetti Cakes Cookbook: Spectacular Cookies, Cakes, and Cupcakes from New York City's Famed Bakery . It just came out last year and I'm so glad I got it. I'm sure you've seen her cakes featured in magazines and saw her compete in numerous Food Network cake challenges. Her background in art and fashion in addition to her incredible talent as a pastry chef is something to be admired. Her book is well-written and beautifully illustrated. The projects in her book range from simple polka-dot cupcakes to the more elaborate sushi cake. I highly recommend it to anyone who wants to learn, not only about sculpted cakes, but also stylish cookies, cupcakes and mini cakes.
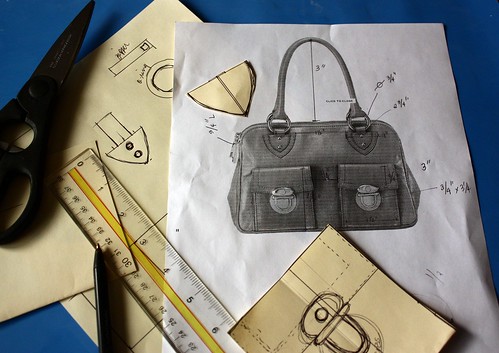
Now that I have a pretty good idea of how to construct a handbag cake, I went ahead and got started. I printed a photo of the pink Marc Jacobs Blake bag from the company's website. Finding the height, width and depth of the bag was easy, but now I needed to get the details of the bag accurate. So, I went back to the photo and measured the size of the pockets, the diameter of the o-rings on the handles, size of the zippers, height of the handles etc... and increased the measurements to match the real proportions of the bag. I drew each piece and cut them out so I can use them as templates.
Now that I have a pretty good idea of how to construct a handbag cake, I went ahead and got started. I printed a photo of the pink Marc Jacobs Blake bag from the company's website. Finding the height, width and depth of the bag was easy, but now I needed to get the details of the bag accurate. So, I went back to the photo and measured the size of the pockets, the diameter of the o-rings on the handles, size of the zippers, height of the handles etc... and increased the measurements to match the real proportions of the bag. I drew each piece and cut them out so I can use them as templates.
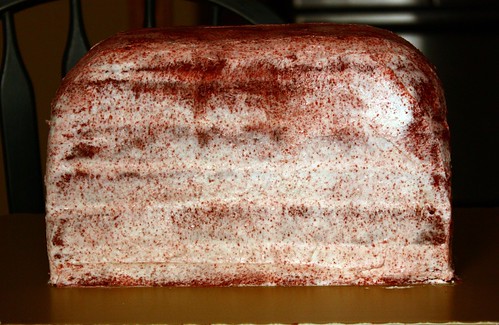
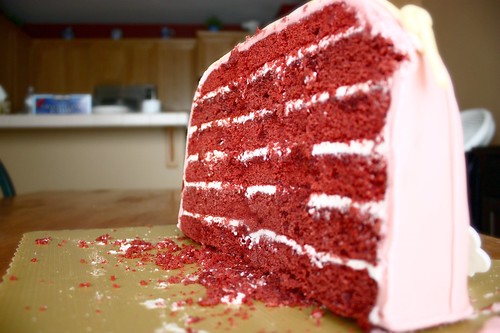
I baked two half sheets of red velvet cake and cut them into three pieces. I assembled the cake and inserted three wooden dowels inside it to prevent the layers from shifting and to keep the cake from collapsing on itself. After crumb coating it with a thin layer of frosting, I placed it in the fridge for a couple of hours to let the frosting firm up. When it was ready, I covered it with pink rolled fondant.
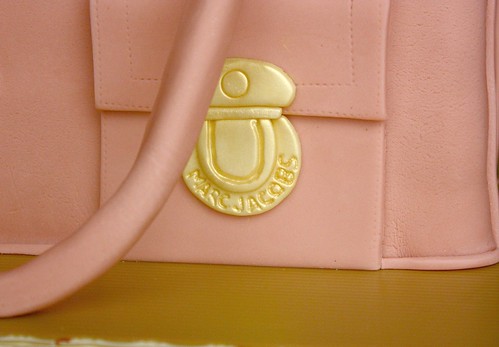
I used the templates to make the pockets and used a tracing wheel for the stitch details around the edges. To make the bottom part of the push-lock hardware, I used a round cookie cutter and a petal cutter, stacked them together then cut the top part off. I used a veining tool to create the groove for the push-lock and a cel stick to write "Marc Jacobs" on the round piece. For the top part of the hardware, I cut a thin strip of fondant and placed a semi-circle fondant on top of it. I used a round piping tip to mark a circle in the middle.
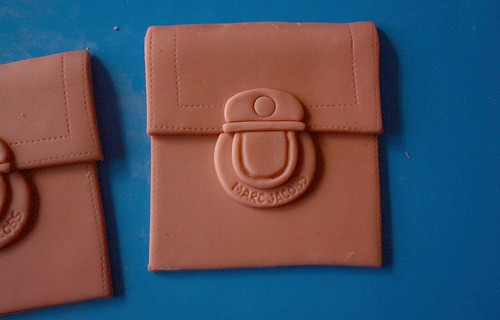
I painted the push-lock with gold luster dust and attached it to the cake by brushing a little bit of vodka on it.
I made the o-rings out of gumpaste by using two different sizes of round cookie cutters. I let them dry overnight, painted them with gold luster dust and looped the fondant handle through it.

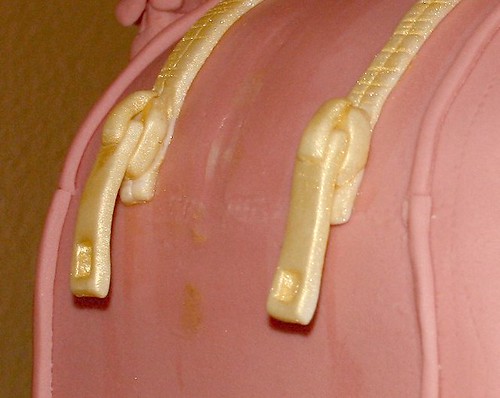
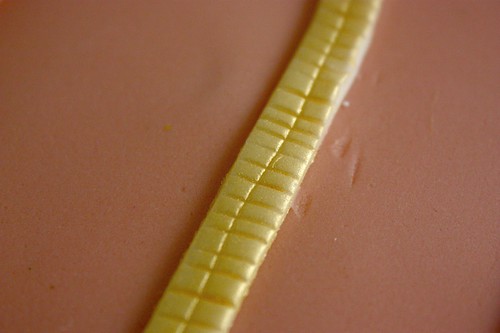
To make the zippers, I cut hexagonal pieces of fondant for the slider, rectangular pieces for the pull-tab and a tiny strip for the tab holder. For the teeth of the zipper, I cut a long strip of fondant and scored a line in the middle and made hash marks all the way from end to end. I painted the zipper and teeth with gold luster dust.
I had a lot of trouble putting on the handles. I guess I should've made them differently. The first pair of handles were made of gumpaste but I didn't make them long enough so I put fondant pieces at each end. Since the gumpaste handles were so thick , the fondant ends couldn't carry the weight so they slipped and wouldn't stay on. I wanted them to be upright like on the picture, but it just didn't work. After trying a couple more times, the handles eventually broke. I didn't have time to make another pair of gumpaste handles so I tried a different approach. I made them out of rolled fondant with stem wire inside for structural support. Made a second attempt to have them standing straight up, but they still fell down. I finally had to settle with laying them on the sides.
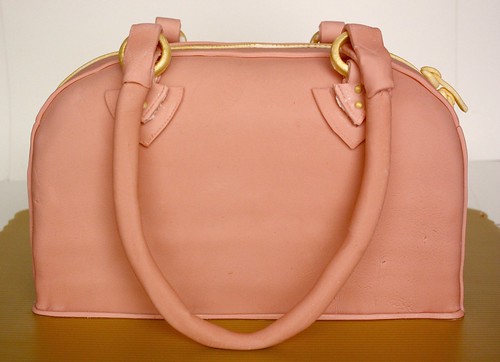
To make the piping around the bag, I just cut long strips of fondant and attached them around the cake.
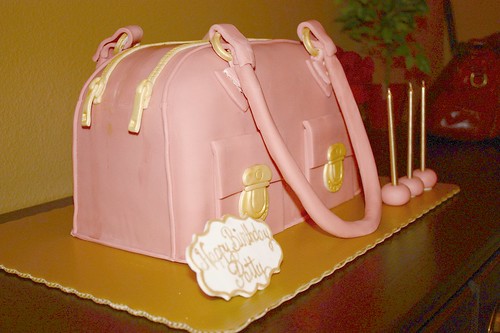
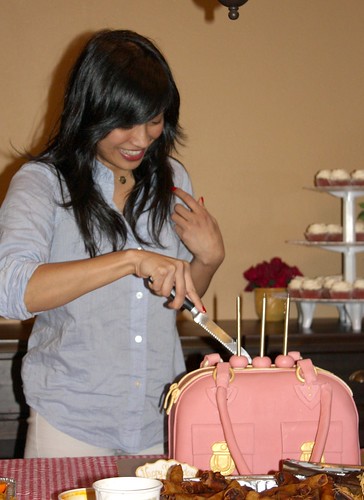
The finished cake was not exactly the way I had envisioned it, but I was pretty happy with it nonetheless. More importantly, the birthday girl loved it and everyone enjoyed eating the cake.
Happy Birthday little sis!
26 comments:
awesome as always, ate rc! so sad i missed it... -ten
It looks amazing! I'm so glad you like our book! I love the cake.
Best Wishes,
Elisa Strauss
(from Confetti Cakes)
This is great. Thank you!
Wow this looks stunning! It must have taken you a good couple of days to get that made. Very lucky person your sister.
This looks AMAZING! What a great baker (and sister) you make!
You're the best sister! The cake looks gorgeous.
Absolutely fabulous--a real work of art--Laduree should be jealous!
Thank you everyone for your kind words. I had fun making this cake, despite the issues with the handles. I'm so happy my sister loved it.
Thank you so much Elisa! Your book is fantastic! Can't wait to get the next one :o)
you're so freakin talented! i can't stand it! the cake was beautiful!
Wow, I didn't think the cake was that big until I saw your sister cutting it. That must have fed a good amount of people, eh?
Nice details, I'm sure if you made another it would come out even Nicer!
That is just fabulous! Great job!
Amazing!! I love your site. I've been decorating cakes for a few months now and I love it. I've made this purse before too only yours looks much better. I'm going to try to do a Louis Vuitton cake next. Keep up the super work!
Thank you for this post, it made me cry. I cant really explain why..maybe because I dont know. But I am a college student going through a trying time. I guess this post told me I should follow my dreams, ne?
Now you can really enjoy posting pics so much more on FB. Whut whut!!! =)
wow! Awesome! I love it.
Miele - Five years ago, I was where you are. I guess I was doing what I thought was expected of me; go to college, get a job, get married etc... Everything seemed to be going as planned (graduated college, got a job, got married), but then my sister pulls a 180 and tells me I should be a pastry chef because I love to make desserts. It was a nice idea. But then I thought, I couldn't possibly give up all that I've worked so hard to accomplish, just to pursue something that's basically a hobby mine.
I was conflicted and yes, I cried about it. My husband said I have to do what makes me happy and if that means starting all over again, so be it. It'll pay off in the future. So I did it. I'm not exactly working as a pastry chef in a five-star hotel or hosting a show on the Food Network, but I'm happy I'm doing what I love.
When you get a chance, read "The Road Not Taken" by Robert Frost.
Fantastico
Thanks so much for the step by step. My gfren's bday is next week and I am thinking of making a branded cake for her but after googling for the last hour or so, I don't think I am good enough for it. Nevertheless, you have got a great blog and I am definitely back checking out. Take care. Edith
beautiful cake!
Absolutely gorgeous cake!!
BTW: How did you get that great plaque, is it a cookie cutter?
Thanks Vettie! I found the gorgeous plaque cutter at Kerekes Bakery.
here's the link:
http://www.bakedeco.com/detail.asp?id=901&keyword=oval%20plaque%20cutter
cute cake..great idea!! nice siblings:)
cross section luks amazing!
Please tell me you live near Sydney, Australia! I would love one for my birthday!
Love it! Thanks for the tutorial too! Love, love, love, Confetti Cakes books too, they are so inspirational and helpful! :)
Candace
it's amazing
Very nice
Post a Comment